Context
In most applications we authenticate users by their emails, phones or via providers like Google, GitHub etc. Which is necessary for most applications, especially if you have regulatory requirements or if you need account recovery or maybe you have to communicate with your users.
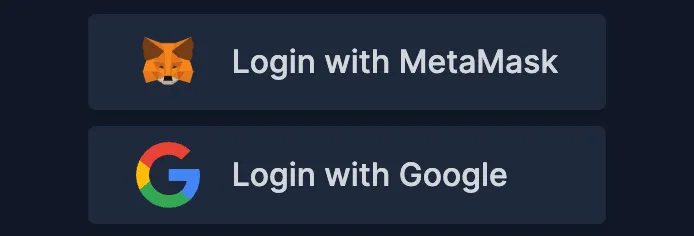
But we can also just let users login with MetaMask instead of sharing their emails, phones etc. It’s also good for anonymity of the users as well.
Flow
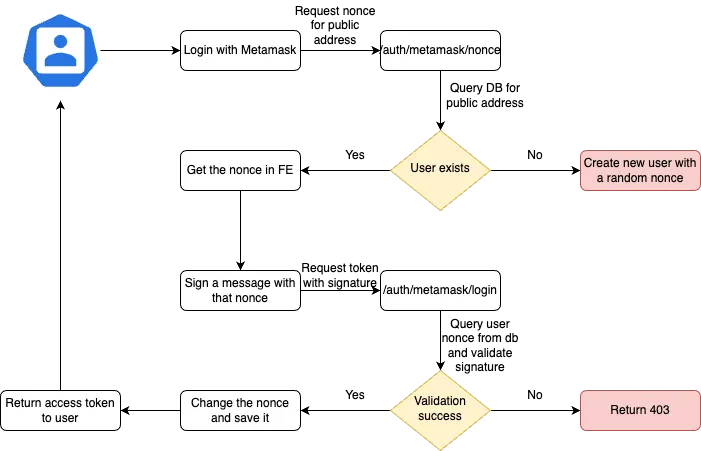
Flow for login is pretty straightforward. As shown in the below diagram, it consists of 2 steps. First, generate the user in the database with the coming public address from frontend and assign a random nonce (number only used once) or if user already exists fetch it and return the nonce of that user. Frontend will use personal_sign to sign that message and send that signature back to backend. After that backend will fetch the user and it’s nonce from database and recover the signature to see if the signature is signed with that specific public address. If everything succeeds, renew the nonce because of security reasons and return access token or temporary credentials to the user.
Code
I am going to use Deno in the backend, but it’s almost the same in Node. For the frontend I’ll be using React, it’ll be 100% same in other libraries/frameworks in frontend, just making requests to an API. Only React depending thing is that I have a useMetamask hook of my own but it’s just about wallet connection, you can implement the same kind of helper in your codebase.
Frontend
I’ll be using ethers@6 library as well within the frontend. You can install it with npm.
useMetamask.tsx this is a custom context/hook to let users connect their wallet to the website.
import { useContext, useState, useEffect, createContext, ReactNode, useMemo } from ‘react’
import { ethers } from ‘ethers’

interface MetamaskContextProps {
  isMetamaskInstalled: boolean,
  isMetamaskLoading: boolean,
  isMetamaskConnected: boolean,
  accounts: ethers.JsonRpcSigner[],
  provider: ethers.BrowserProvider,
  connectToMetamask: () => Promise<void>
}

const MetamaskContext = createContext<MetamaskContextProps>({} as MetamaskContextProps)

export function useMetamask() {
  return useContext(MetamaskContext)
}

export function MetamaskProvider({ children }: { children: ReactNode }) {
  const [isMetamaskLoading, setIsMetamaskLoading] = useState(false)
  const [isMetamaskInstalled, setIsMetamaskInstalled] = useState(false)
  const [isMetamaskConnected, setIsMetamaskConnected] = useState(false)
  const [accounts, setAccounts] = useState<MetamaskContextProps[‘accounts’]>([])
  const provider = useMemo<MetamaskContextProps[‘provider’]>(() => new ethers.BrowserProvider(window.ethereum, ‘any’), [])

  // set necessary states for the metamask wallet on mount
  useEffect(() => {
    !async function () {
      if (window.ethereum) {
        setIsMetamaskLoading(true)
        setIsMetamaskInstalled(true)
        const accounts = await provider.listAccounts()
        setAccounts(accounts)
        setIsMetamaskConnected(accounts.length > 0)
        setIsMetamaskLoading(false)
      }
    }()
  }, [])

  // send `eth_requestAccounts` which will show a popup to users to connect their wallet
  async function connectToMetamask() {
    if (window.ethereum) {
      try {
        const accounts = await window.ethereum.request({ method: ‘eth_requestAccounts’ })
        setAccounts(accounts)
        setIsMetamaskConnected(true)
      } catch (error) {
        console.error(error)
      }
    } else {
      console.error('Metamask not detected')
    }
  }

  const value = {
    isMetamaskInstalled,
    isMetamaskLoading,
    isMetamaskConnected,
    accounts,
    provider,
    connectToMetamask
  }

  return (
    <MetamaskContext.Provider value={value}>
      {children}
    </MetamaskContext.Provider>
  )
}
Then of course you have to wrap your component with the MetamaskProvider that is exported by the above hook.
// in one of your parent component
return (
  <MetamaskProvider>
    <ConnectMetamask setLoading={setLoading} />
  </MetamaskProvider>
)
Now we have one more step left. We have to connect our users, get their public address and send it to backend to get nonce and then to login. Let’s see that part:
import Button, { Variant } from './Button'
import { useMetamask } from '@/hooks/useMetamask'
import { api } from '@/utils/api' // it's just an axios instance with application/json headers, nothing special

export default function ConnectMetamask() {
  const { isMetamaskConnected, connectToMetamask } = useMetamask()

  const connectWithMetamask = async () => {
    // if user is not already connected, force them to connect their wallet
    if (!isMetamaskConnected) return connectToMetamask()

    const selectedAddress = window.ethereum.selectedAddress

    // request to nonce endpoint to get a random nonce
    const { data: { nonce } } = await api.get(`/auth/metamask/nonce?address=${selectedAddress}`)
    // sign the nonce with the selected public address of the connected wallet
    const signature = await window.ethereum.request({
      method: 'personal_sign',
      params: [nonce, selectedAddress]
    })

    // send another request to login endpoint with the signature which is signed with the user's nonce
    await api.post(`/auth/metamask/login?address=${selectedAddress}`, { signature })

    // you can return an access token for the user, or maybe temporary credentials and then sign in, it's up to you
    // ...
  }

  return (
    <Button onClick={connectWithMetamask} variant={Variant.Tertiary} className="shadow-md flex items-center gap-4 rounded">
      Connect with MetaMask
    </Button>
  )
}
Backend
As I said, this is a Deno backend which uses Oak framework but almost everything is the same in Node. Let’s start with the setup.
First of all, in Deno we have the deno.json or import_map.json file for imports. I use deno.json with the imports property.
deno.jsonc
{
  "tasks": {
    "dev": "deno run --allow-net --allow-read --allow-env --allow-ffi --watch main.ts",
  },
  "imports": {
    "std/": "https://deno.land/std@0.194.0/",
    "oak": "https://deno.land/x/oak@v12.6.0/mod.ts",
    "cors": "https://deno.land/x/cors@v1.2.2/mod.ts",
    "cuid": "npm:@paralleldrive/cuid2@2.2.1",
    "@metamask/eth-sig-util": "npm:@metamask/eth-sig-util@6.0.0"
  }
}
main.ts and here is our server entry point:
import "std/dotenv/load.ts";
import { Application } from "oak";
import { oakCors } from "cors";
import { router as authRouter } from "./auth/router.ts";

const app = new Application();

app
  .use(oakCors({ origin: "http://localhost:3000", credentials: true }))
  .use(authRouter.routes(), authRouter.allowedMethods());

await app.listen({ port: 8001 });
Now let’s go into our routes which is the most important part.
import { Router } from "oak";
import { createId } from "cuid";
import { recoverPersonalSignature } from "@metamask/eth-sig-util";
import { getMetamaskUser, createMetamaskUser, updateMetamaskUser } from "./mock-queries.ts";

export const router = new Router();

router
  .get("/auth/metamask/nonce", async (ctx) => {
    // get the address from the query string (add your validation)
    const { address } = ctx.request.url.searchParams.get("address")

    // query the metamask user from the database with the public address
    const { data: user } = await getMetamaskUser(address);

    // if user does not exists, create a new one with a random nonce
    // and return the nonce, otherwise return the fetched user’s nonce
    if (!user) {
      const nonce = createId()
      await createMetamaskUser({
        provider: "metamask",
        nonce: createId(),
        address
      })

      return ctx.response.body = { nonce };
    } else {
      return ctx.response.body = { nonce: user.nonce };
    }
  })
  .post("/auth/metamask/login", async (ctx) => {
    // get the address from the query string and signature from the request body (add your validation)
    const { address } = ctx.request.url.searchParams.get("address")
    const { signature } = await ctx.request.body({ type: "json" }).value

    // query the metamask user again and throw 403 if not exists
    const { data: user } = await getMetamaskUser(address);
    if (!user) return ctx.throw(403);

    // use @metamask/eth-sig-util to recover personal signature by passing the data that was signed
    // and the signature that is sent by the frontend
    const recoveredAddress = recoverPersonalSignature({ data: user.raw_user_meta_data.nonce, signature });
    // this function will recover the address that was used to sign the nonce
    // so if recoveredAddress !== address means that the address sent is not the one who signs it, return 403
    if (recoveredAddress !== address) return ctx.throw(403);

    // renew the nonce of the user so that specific nonce is invalid from now on
    // otherwise if we keep use the same nonce it’s viewable on chain data
    // which will allow other users to compromise and act on behalf of other users
    const nonce = createId();
    await updateMetamaskUser({ nonce })

    // return the temporary credentials or return cookie
    return ctx.response.body = { ... };
  });
Also remember that the signed message does not have to be a nonce only. It can include text to inform users as long as you also recover the signature from the correct data. If you sign the text as well, you have to include that text while recovering in the backend.
This is just for authentication purposes and it won’t cost any gas fees.
Nonce: ${RANDOM_NONCE_HERE}
That’s it! Now users are able to login with only their MetaMask wallet (of course you can implement the same thing with other wallets).
Many thanks to our teammate Doğukan Akkaya for providing this awesome blog – be sure to follow Doğukan at https://medium.com/@dogukanakkaya for all his latest posts.
Related Articles
Launch Your First Secure SaaS API in 5 Days
Looking to launch a secure SaaS API quickly? Our 5-day API lifecycle fast-track helps star...
Read more
Cloud Cost Optimization: Quick Wins to Slash Unnecessary Spending
Discover quick wins for cloud cost optimization! Learn how to cut unnecessary spending, ri...
Read more
AWS – REST API vs HTTP API – Integrating Auth0
Explore the differences between REST API and HTTP API in AWS and how built-in JWT authenti...
Read more
Reflecting on 2024: A Year of Growth, Innovation, and Milestones
Reflect on 2024 with Cyrex Enterprise! Discover our achievements in software development, ...
Read more