Looking to deploy NestJS microservices on AWS ECS with seamless CI/CD using Pulumi? In our latest Engineer write up Doğukan Akkaya walks you through deploying NestJS apps with multiple environments and configuring infrastructure as code (IaC) with Pulumi!
Application
I will create 3 NestJS apps within a monorepo: 2 internal services that will be communicated via TCP and an API Gateway that calls these services. The API Gateway endpoints /order and /payment will call the respective services and return their responses. First, let’s create the Dockerfile.
FROM node:20-alpine AS base
EXPOSE 3000 3001 3002
ARG APP
WORKDIR /app
COPY package*.json .

FROM base AS development
ARG NODE_ENV=development
ENV NODE_ENV=${NODE_ENV}
RUN npm install
COPY . .
RUN npm run build ${APP}

ENV DEPLOY_COMMAND="node /app/dist/apps/${APP}/main"
CMD $DEPLOY_COMMAND

FROM base AS production
ARG NODE_ENV=production
ENV NODE_ENV=${NODE_ENV}
RUN npm install --production
COPY . .
RUN npm run build ${APP}

ENV DEPLOY_COMMAND="node /app/dist/apps/${APP}/main"
CMD $DEPLOY_COMMAND
Dockerfile is shared among all services, not separate for each. Essentially it expects one APP argument (api, order, payment) and builds that specific service and eventually serves that with node . See the source repository at the end of the article for more details on this.
Pulumi
Pulumi is an IaC (Infrastructure as Code) platform similar to Terraform, Cloudformation, Cloud Deployment Manager etc. If you have tried one of these before you probably configured your project’s infra in a Declarative way, using either YAML definitions or JSON (less common but an option).
Pulumi on the other hand, you can create configurations Imperatively, with many different programming languages: Typescript, Python, Go etc. (using YAML is still possible with Pulumi but not common). Main advantage of Pulumi is development speed, of course we still need the DevOps skills and knowledge but nonetheless it has benefits such as:
- No need to learn a new syntax for
.tf(HCL) for Terraform as well as special functions in.yamlfiles, already familiar. - High collaboration, every developer in your team able to understand the code.
- Type safety, many of the supported languages offer type checking and autocompletion in IDEs & Editors
- Reusability, ability to write functions, loops etc. very easily
- Deploy to any cloud service you like: AWS, GCP, Azure… while Cloudformation is only for AWS as well as Cloud Deployment Manager for GCP.
Just for curious people, another alternative to Pulumi is The Cloud Development Kit (can be used with Terraform)
To use Pulumi first we need to install the CLI tool. See the installation option for your OS: https://www.pulumi.com/docs/install/
Setting Up the Project
I am gonna use Typescript as the programming language for the infra. Create a new project using Pulumi CLI:
pulumi new aws-typescript
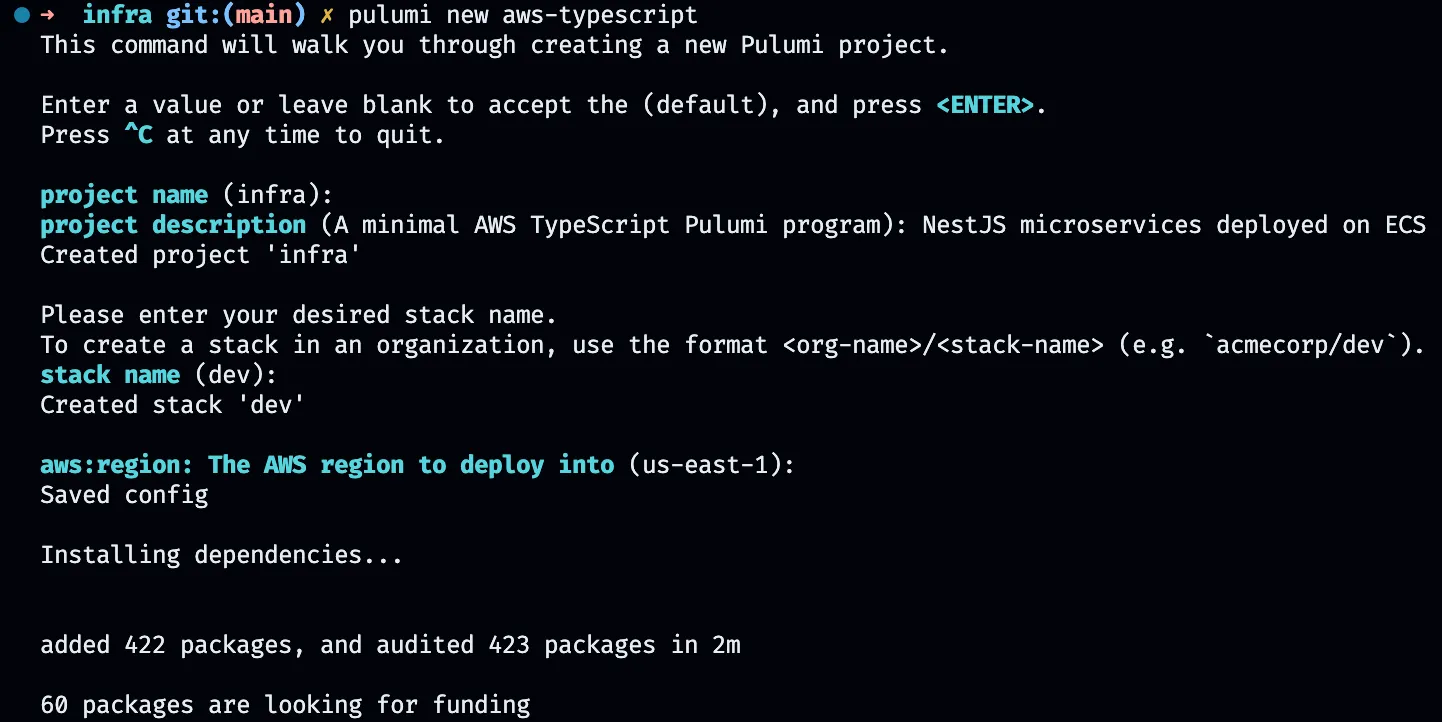
I created a devstack and result of that index.ts file created for our infrastructure configuration and Pulumi.yaml for the Pulumi settings. Although you can create separate Pulumi.dev.yaml and Pulumi.prod.yaml files for different environments, I will delete them and use a single YAML configuration for simplicity.
After the project is created, init the prod stack:
pulumi stack init prod
Infra Configuration
You start with a single index.ts file in Pulumi which is the entrypoint of your configuration and most of the time everything is written inside this single file.
Nonetheless it’s Typescript eventually which means you can import/export anything, even if your resources separated into multiple files they will be created as long as it’s imported in the entrypoint file.
Let’s start with Networking, creating a VPC, Security Groups, LoadBalancer for the API Gateway.
import * as pulumi from "@pulumi/pulumi";
import * as aws from "@pulumi/aws";
import * as awsx from "@pulumi/awsx";

interface Props {
  stack: string;
}

export function configureNetwork({ stack }: Props) {
  const vpc = new awsx.ec2.Vpc(`vpc-${stack}`, {
    cidrBlock: "10.0.0.0/16",
    numberOfAvailabilityZones: 2,
    enableDnsHostnames: true,
  });

  const apiSg = new aws.ec2.SecurityGroup(`api-${stack}`, {
    vpcId: vpc.vpcId,
    ingress: [
      { protocol: "tcp", fromPort: 3000, toPort: 3000, cidrBlocks: ["0.0.0.0/0"] },
      { protocol: "tcp", fromPort: 80, toPort: 80, cidrBlocks: ["0.0.0.0/0"] }
    ],
    egress: [
      { protocol: "-1", fromPort: 0, toPort: 0, cidrBlocks: ["0.0.0.0/0"] }
    ]
  });

  const servicesSg = new aws.ec2.SecurityGroup(`services-${stack}`, {
    vpcId: vpc.vpcId,
    ingress: [
      { protocol: "tcp", fromPort: 3001, toPort: 3001, cidrBlocks: ["0.0.0.0/0"] },
      { protocol: "tcp", fromPort: 3002, toPort: 3002, cidrBlocks: ["0.0.0.0/0"] },
    ],
    // needs outbound access to pull images from ECR (you can allow to ECR CIDR by creating a vpc endpoint)
    egress: [
      { protocol: "-1", fromPort: 0, toPort: 0, cidrBlocks: ["0.0.0.0/0"] }
    ]
  });

  const lb = new awsx.lb.ApplicationLoadBalancer(`lb-${stack}`, {
    subnetIds: vpc.publicSubnetIds,
    defaultTargetGroup: {
      vpcId: vpc.vpcId,
      port: 3000,
      healthCheck: {
        path: "/health",
        interval: 30,
        timeout: 15,
        healthyThreshold: 2,
        unhealthyThreshold: 2,
      },
    },
    securityGroups: [apiSg.id],
  });

  return { vpc, apiSg, servicesSg, lb }
}
- VPC: Create a new VPC for the application with 2 availability zones. public subnets for API Gateway, private subnets for the Microservices. DNS Hostnames must be enabled to use DNS Namespaces (used for service discovery).
- API Security Group: This is for the API Gateway, it allows all inbound traffic on port 3000 and 80 and allows all outbound traffic to any port.
- Services Security Group: You can separate this per service but I am just gonna use a shared one. It allows all inbound traffic from ports 3001 (payment) and 3002 (order) and allows all outbound traffics to any port which is necessary for pulling images from ECR.
- API LoadBalancer: LoadBalancer for the API Gateway using the API Security Group, creating a new Target Group for traffic routing.
Now create shared resources on services: an ECS Cluster and Private DNS Namespace to discover our internal services from the API GW.
import * as aws from "@pulumi/aws";
import * as awsx from "@pulumi/awsx";

interface Props {
  stack: string;
  vpc: awsx.ec2.Vpc;
}

export function configureServices({ stack, vpc }: Props) {
  const cluster = new aws.ecs.Cluster(`cluster-${stack}`);

  const namespace = new aws.servicediscovery.PrivateDnsNamespace(`namespace-${stack}`, {
    vpc: vpc.vpcId,
    name: "service.local",
  });

  return { cluster, namespace }
}

export * from './api';
export * from './order';
export * from './payment';
ECS Fargate Services will be deployed in this cluster and namespace will be used for the service discovery.
API Gateway
import * as aws from "@pulumi/aws";
import * as awsx from "@pulumi/awsx";

interface Props {
  stack: string;
  env: string;
  vpc: awsx.ec2.Vpc;
  cluster: aws.ecs.Cluster;
  apiSg: aws.ec2.SecurityGroup;
  lb: awsx.lb.ApplicationLoadBalancer;
}

export function configureApi({ stack, env, vpc, cluster, apiSg, lb }: Props) {
  const apiRepository = new awsx.ecr.Repository(`api-${stack}`);

  const apiImage = new awsx.ecr.Image(`api-${stack}`, {
    repositoryUrl: apiRepository.url,
    platform: 'linux/amd64',
    context: "../../",
    args: {
      APP: 'api',
      NODE_ENV: env
    },
    target: env
  });

  const apiService = new awsx.ecs.FargateService("api-service", {
    cluster: cluster.arn,
    taskDefinitionArgs: {
      container: {
        name: `api-${stack}`,
        image: apiImage.imageUri,
        cpu: 128,
        memory: 256,
        portMappings: [
          { containerPort: 3000, targetGroup: lb.defaultTargetGroup },
        ],
      },
    },
    networkConfiguration: {
      subnets: vpc.publicSubnetIds,
      securityGroups: [apiSg.id],
      assignPublicIp: true
    },
    desiredCount: 1,
  });
}
- Repository: Create the ECR to deploy the Docker images
- Image: Configure the image with the Dockerfile path and arguments like
APP(to specify which service to build) andNODE_ENV, platform, and target. This will automatically build and push the image to the ECR repository. - Service: Use the cluster created above. Specify container arguments like image name, URI, resources, and the LoadBalancer’s target group with the container’s port. Network configuration will deploy this in a public subnet, automatically assign a public IP, and use the API security group defined in the network section to allow traffic. The desired count for a task is 1, which can be scaled up if needed.
Order Service
import * as aws from "@pulumi/aws";
import * as awsx from "@pulumi/awsx";

interface Props {
  stack: string;
  env: string;
  vpc: awsx.ec2.Vpc;
  cluster: aws.ecs.Cluster;
  namespace: aws.servicediscovery.PrivateDnsNamespace;
  servicesSg: aws.ec2.SecurityGroup;
}

export function configureOrder({ stack, env, vpc, cluster, namespace, servicesSg }: Props) {
  const orderServiceDiscovery = new aws.servicediscovery.Service(`order-service-discovery-${stack}`, {
    name: 'order',
    dnsConfig: {
      namespaceId: namespace.id,
      dnsRecords: [
        {
          ttl: 10,
          type: 'A',
        },
      ],
    },
    healthCheckCustomConfig: {
      failureThreshold: 1,
    },
  });

  const orderRepository = new awsx.ecr.Repository(`order-${stack}`);

  const orderImage = new awsx.ecr.Image(`order-${stack}`, {
    repositoryUrl: orderRepository.url,
    platform: 'linux/amd64',
    context: "../../",
    args: {
      APP: 'order',
      NODE_ENV: env
    },
    target: env
  });

  const orderService = new awsx.ecs.FargateService("order-service", {
    cluster: cluster.arn,
    taskDefinitionArgs: {
      container: {
        name: `order-${stack}`,
        image: orderImage.imageUri,
        cpu: 128,
        memory: 256,
        portMappings: [
          { containerPort: 3002 },
        ],
      },
    },
    networkConfiguration: {
      subnets: vpc.privateSubnetIds,
      securityGroups: [servicesSg.id]
    },
    serviceRegistries: {
      registryArn: orderServiceDiscovery.arn
    },
    desiredCount: 1,
  });

}
Not a lot of difference here than the API Gateway. Only exceptional thing is that we don’t specify a Load Balancer which is not needed, network configuration uses the private subnets instead of public and also the security group servicesSg .
We also have to create a service discovery for communication from API GW to services and configure serviceRegistries .
Payment Service (almost no difference with Order Service)
import * as aws from "@pulumi/aws";
import * as awsx from "@pulumi/awsx";

interface Props {
  stack: string;
  env: string;
  vpc: awsx.ec2.Vpc;
  cluster: aws.ecs.Cluster;
  namespace: aws.servicediscovery.PrivateDnsNamespace;
  servicesSg: aws.ec2.SecurityGroup;
}

export function configurePayment({ stack, env, vpc, cluster, namespace, servicesSg }: Props) {
  const paymentServiceDiscovery = new aws.servicediscovery.Service(`payment-service-discovery-${stack}`, {
    name: 'payment',
    dnsConfig: {
      namespaceId: namespace.id,
      dnsRecords: [
        {
          ttl: 10,
          type: 'A',
        },
      ],
    },
    healthCheckCustomConfig: {
      failureThreshold: 1,
    },
  });

  const paymentRepository = new awsx.ecr.Repository(`payment-${stack}`);

  const paymentImage = new awsx.ecr.Image(`payment-${stack}`, {
    repositoryUrl: paymentRepository.url,
    platform: 'linux/amd64',
    context: "../../",
    args: {
      APP: 'payment',
      NODE_ENV: env
    },
    target: env
  });

  const paymentService = new awsx.ecs.FargateService("payment-service", {
    cluster: cluster.arn,
    taskDefinitionArgs: {
      container: {
        name: `payment-${stack}`,
        image: paymentImage.imageUri,
        cpu: 128,
        memory: 256,
        essential: true,
        portMappings: [
          {
            containerPort: 3001,
          },
        ],
      },
    },
    networkConfiguration: {
      subnets: vpc.privateSubnetIds,
      securityGroups: [servicesSg.id]
    },
    serviceRegistries: {
      registryArn: paymentServiceDiscovery.arn
    },
    desiredCount: 1,
  });
}
Now we have to import all of these in the entrypoint of our Pulumi program.
import * as pulumi from "@pulumi/pulumi";
import { configureNetwork } from './network';
import { configureApi, configureOrder, configurePayment, configureServices } from './services';

const stack = pulumi.getStack()
const env = stack === 'dev' ? 'development' : 'production';

const { vpc, apiSg, servicesSg, lb } = configureNetwork({ stack });
const { cluster, namespace } = configureServices({ stack, vpc });

configureApi({ stack, env, vpc, cluster, apiSg, lb });
configureOrder({ stack, env, vpc, cluster, namespace, servicesSg });
configurePayment({ stack, env, vpc, cluster, namespace, servicesSg });

export const vpcId = vpc.vpcId;
export const privateSubnetIds = vpc.privateSubnetIds;
export const publicSubnetIds = vpc.publicSubnetIds;
export const defaultSecurityGroupId = vpc.vpc.defaultSecurityGroupId;
export const defaultTargetGroupId = lb.defaultTargetGroup.id;
export const apiSecurityGroupId = apiSg.id;
export const servicesSecurityGroupId = servicesSg.id;
export const url = pulumi.interpolate`http://${lb.loadBalancer.dnsName}`;
Everything you export from here will be Outputs.
Now we can deploy our infra with pulumi up --stack dev|prod
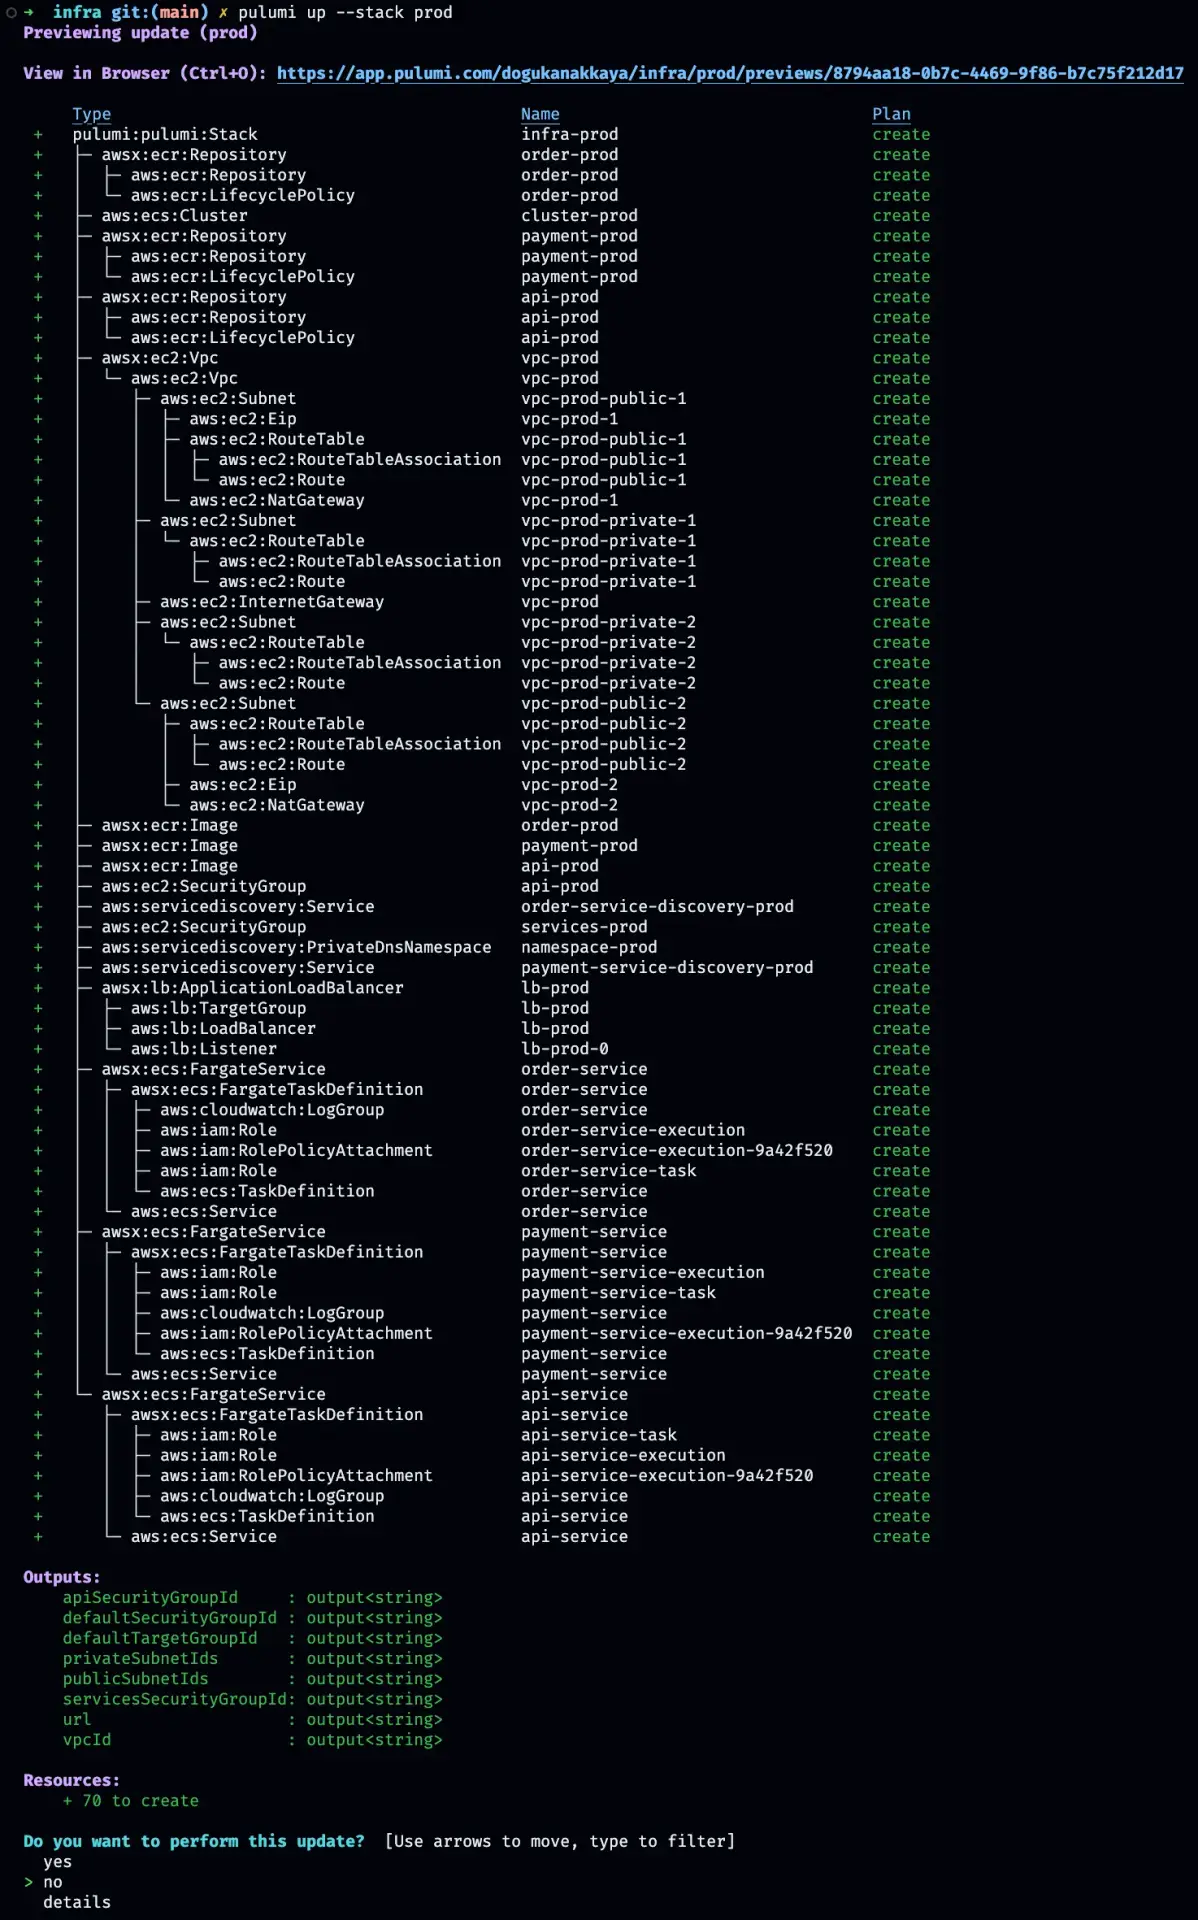
Pulumi creates a preview for us to inspect what will be created, updated, replaced. If you’re running it the first time, you’ll see an output similar to what’s above. You may notice even though we didn’t specified, Pulumi creates some resources for us like ECR lifecycle policies, cloudwatch log groups etc. which is very nice. Now you can either confirm the changes or cancel.
Remember that of course you have to either export or create your AWS Credentials config first. Access Key ID and Secret Access Key otherwise it will fail.
CI/CD with GitHub Actions
First of all you have to create 4 Secrets for the GitHub actions from the settings. AWS_ACCESS_KEY_ID , AWS_SECRET_ACCESS_KEY , AWS_REGION , PULUMI_ACCESS_TOKEN . You can get your Pulumi access token from the Pulumi dashboard: https://app.pulumi.com/<username>/settings/tokens
Create your .github/workflows directory and 2 files under one for Preview on pull requests and the other one is deploying the infra on merges.
.github/workflows/pull_request.yml
name: Pulumi
on:
  - pull_request
env:
  STACK_NAME: ${{ github.ref == 'refs/heads/main' && 'prod' || 'dev' }}
jobs:
  preview:
    name: Preview
    runs-on: ubuntu-latest
    steps:
      - uses: actions/checkout@v4
      - uses: actions/setup-node@v4
        with:
          node-version-file: package.json
      - name: Configure AWS Credentials
        uses: aws-actions/configure-aws-credentials@v1
        with:
          aws-access-key-id: ${{ secrets.AWS_ACCESS_KEY_ID }}
          aws-region: ${{ secrets.AWS_REGION }}
          aws-secret-access-key: ${{ secrets.AWS_SECRET_ACCESS_KEY }}
      - run: npm install
        working-directory: packages/infra
      - uses: pulumi/actions@v5
        with:
          command: preview
          stack-name: ${{ env.STACK_NAME }}
          work-dir: packages/infra
        env:
          PULUMI_ACCESS_TOKEN: ${{ secrets.PULUMI_ACCESS_TOKEN }}
.github/workflows/push.yml
name: Pulumi
on:
  push:
    branches:
      - main
      - dev
env:
  STACK_NAME: ${{ github.ref == 'refs/heads/main' && 'prod' || 'dev' }}
jobs:
  update:
    name: Update
    runs-on: ubuntu-latest
    steps:
      - uses: actions/checkout@v4
      - uses: actions/setup-node@v4
        with:
          node-version-file: package.json
      - name: Configure AWS Credentials
        uses: aws-actions/configure-aws-credentials@v1
        with:
          aws-access-key-id: ${{ secrets.AWS_ACCESS_KEY_ID }}
          aws-region: ${{ secrets.AWS_REGION }}
          aws-secret-access-key: ${{ secrets.AWS_SECRET_ACCESS_KEY }}
      - run: npm install
        working-directory: packages/infra
      - uses: pulumi/actions@v5
        with:
          command: up
          stack-name: ${{ env.STACK_NAME }}
          work-dir: packages/infra
        env:
          PULUMI_ACCESS_TOKEN: ${{ secrets.PULUMI_ACCESS_TOKEN }}
Now you should be able to see your pipelines work on every pull request (preview) and on merge to main and dev branches (up).
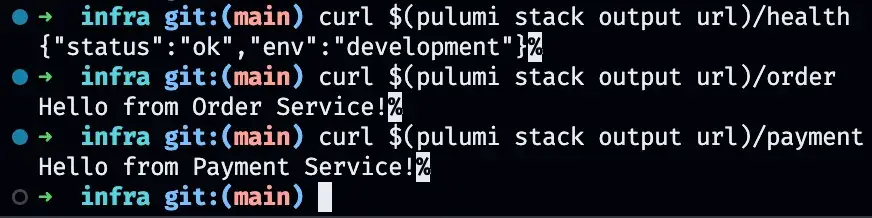
Finally you should be able to request your API and your API GW should be able to call internal services. You can inspect the resources both on Pulumi Dashboard and on AWS Console. From now on you can setup a domain with HTTPS, separate your Docker builds etc. feel free to change to your needs.
Source Repository: github.com/dogukanakkaya/nestjs-ms-pulumi-ecs
Many thanks to our teammate Doğukan Akkaya for providing this awesome blog – be sure to follow Doğukan at https://medium.com/@dogukanakkaya for all his latest posts.
Related Articles
Launch Your First Secure SaaS API in 5 Days
Looking to launch a secure SaaS API quickly? Our 5-day API lifecycle fast-track helps star...
Read more
Cloud Cost Optimization: Quick Wins to Slash Unnecessary Spending
Discover quick wins for cloud cost optimization! Learn how to cut unnecessary spending, ri...
Read more
AWS – REST API vs HTTP API – Integrating Auth0
Explore the differences between REST API and HTTP API in AWS and how built-in JWT authenti...
Read more
Reflecting on 2024: A Year of Growth, Innovation, and Milestones
Reflect on 2024 with Cyrex Enterprise! Discover our achievements in software development, ...
Read more